이 튜토리얼은 마인크래프트의 메뉴를 이해하고 탐색하는 데 도움이 될 수 있다. 대부분 설명이 불필요할 정도로 쉽지만, 일부 몇개는 설명이 필요할 수 있다. 메뉴를 탐색하는데 도움이 필요하다면, 이 튜토리얼에서 필요에 따라 적절한 문단을 찾으면 된다.
마인크래프트에는 메인 메뉴와 일시정지 메뉴라는 두 가지 메뉴 그룹이 있다.
메인 메뉴
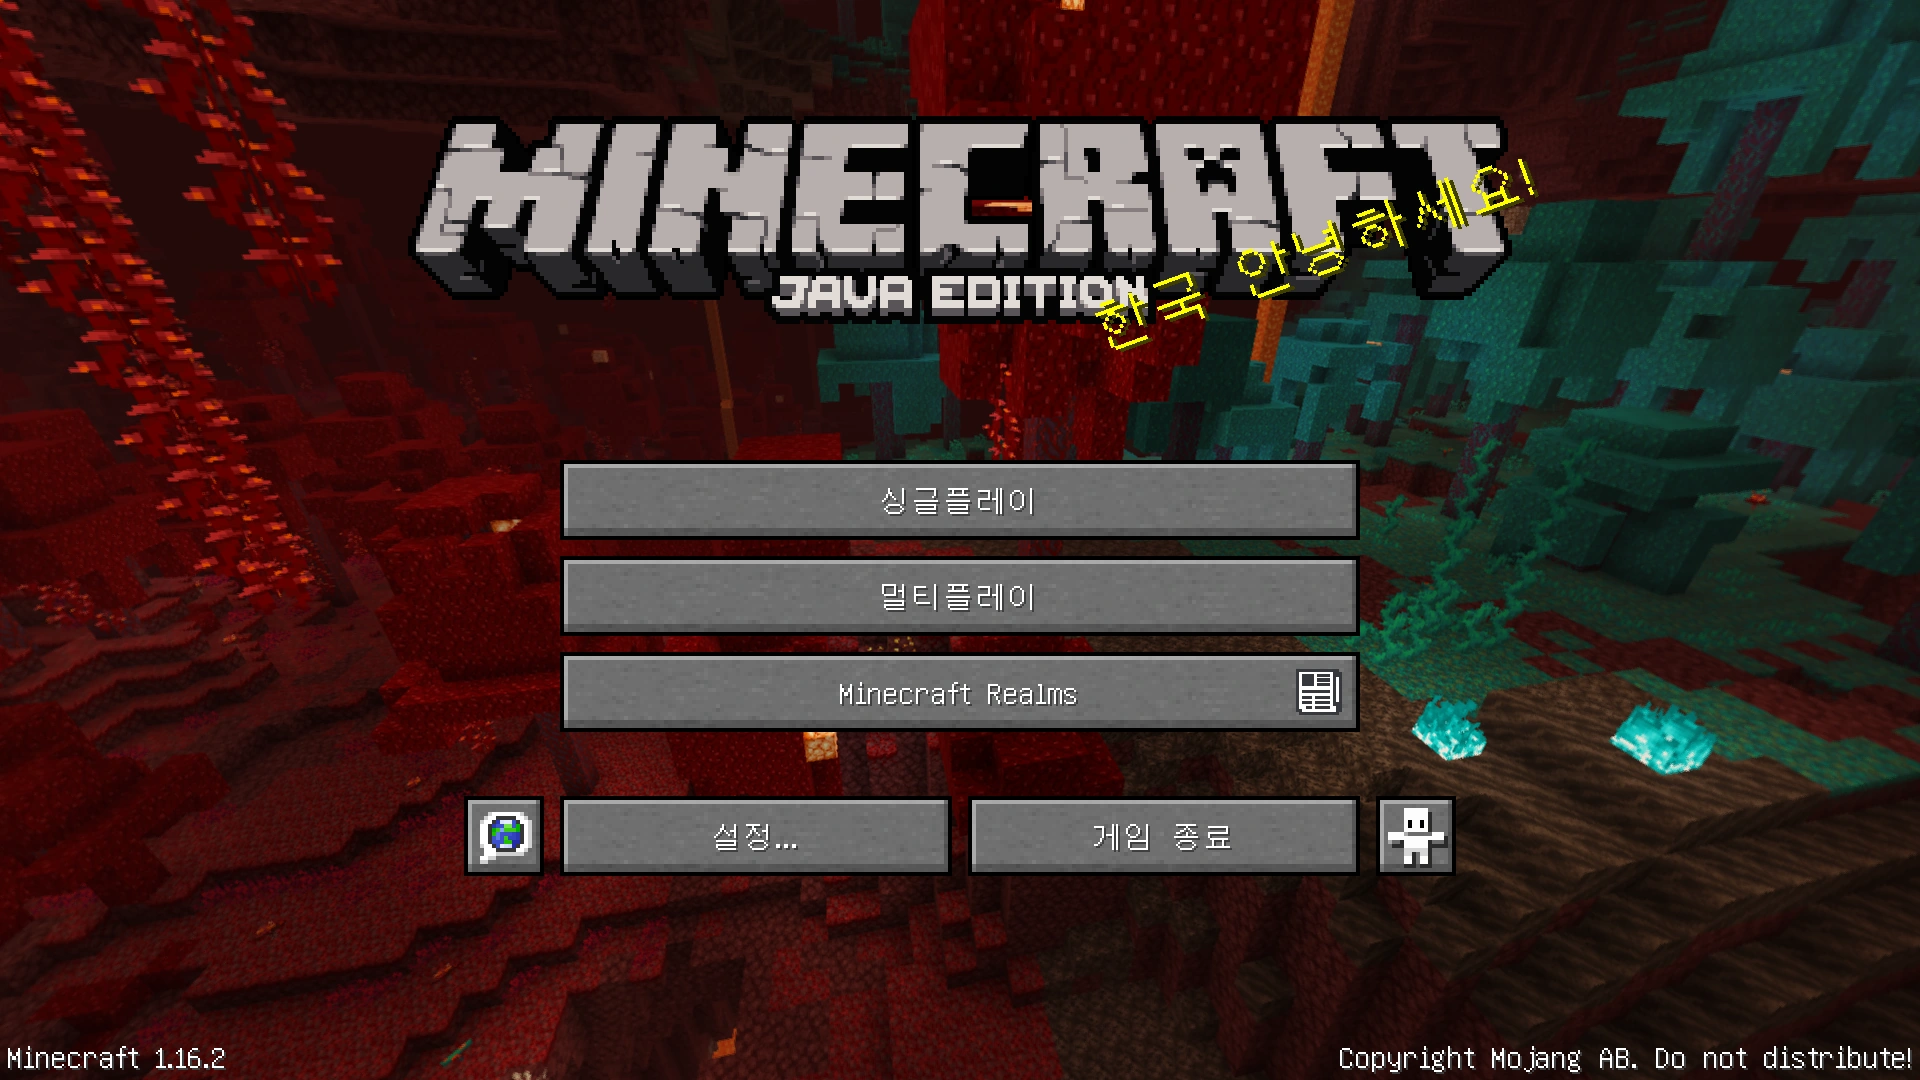
메인 메뉴의 사진이다.
메인 메뉴는 게임을 시작하면 맨 처음으로 보게 되는 것이다. 게임 로고와 함께 게임 로고 오른쪽 하단에 스플래시 텍스트가 표시되고, 단추 그룹 뒤쪽에 움직이는 흐릿한 파노라마, 왼쪽 하단의 마인크래프트 버전도 함께 나타난다. 이 메뉴에서 마인크래프트 Realms, 게임 옵션에 들어가거나 바탕화면으로 나갈 수 있다. 뿐만 아니라 플레이할 게임 유형도 여기에서 선택할 수 있다.
| 단추 | 기능 |
|---|---|
| 싱글플레이 | 싱글플레이 화면으로 이동한다. |
| 멀티플레이 | 멀티플레이 화면으로 이동한다. |
| Minecraft Realms | 마인크래프트 Realms 화면으로 이동한다. |
| 지구 아이콘 | 언어 화면으로 이동한다. |
| 설정 | 설정 화면으로 이동한다. |
| 게임 종료 | 게임에서 나간다. |
싱글플레이
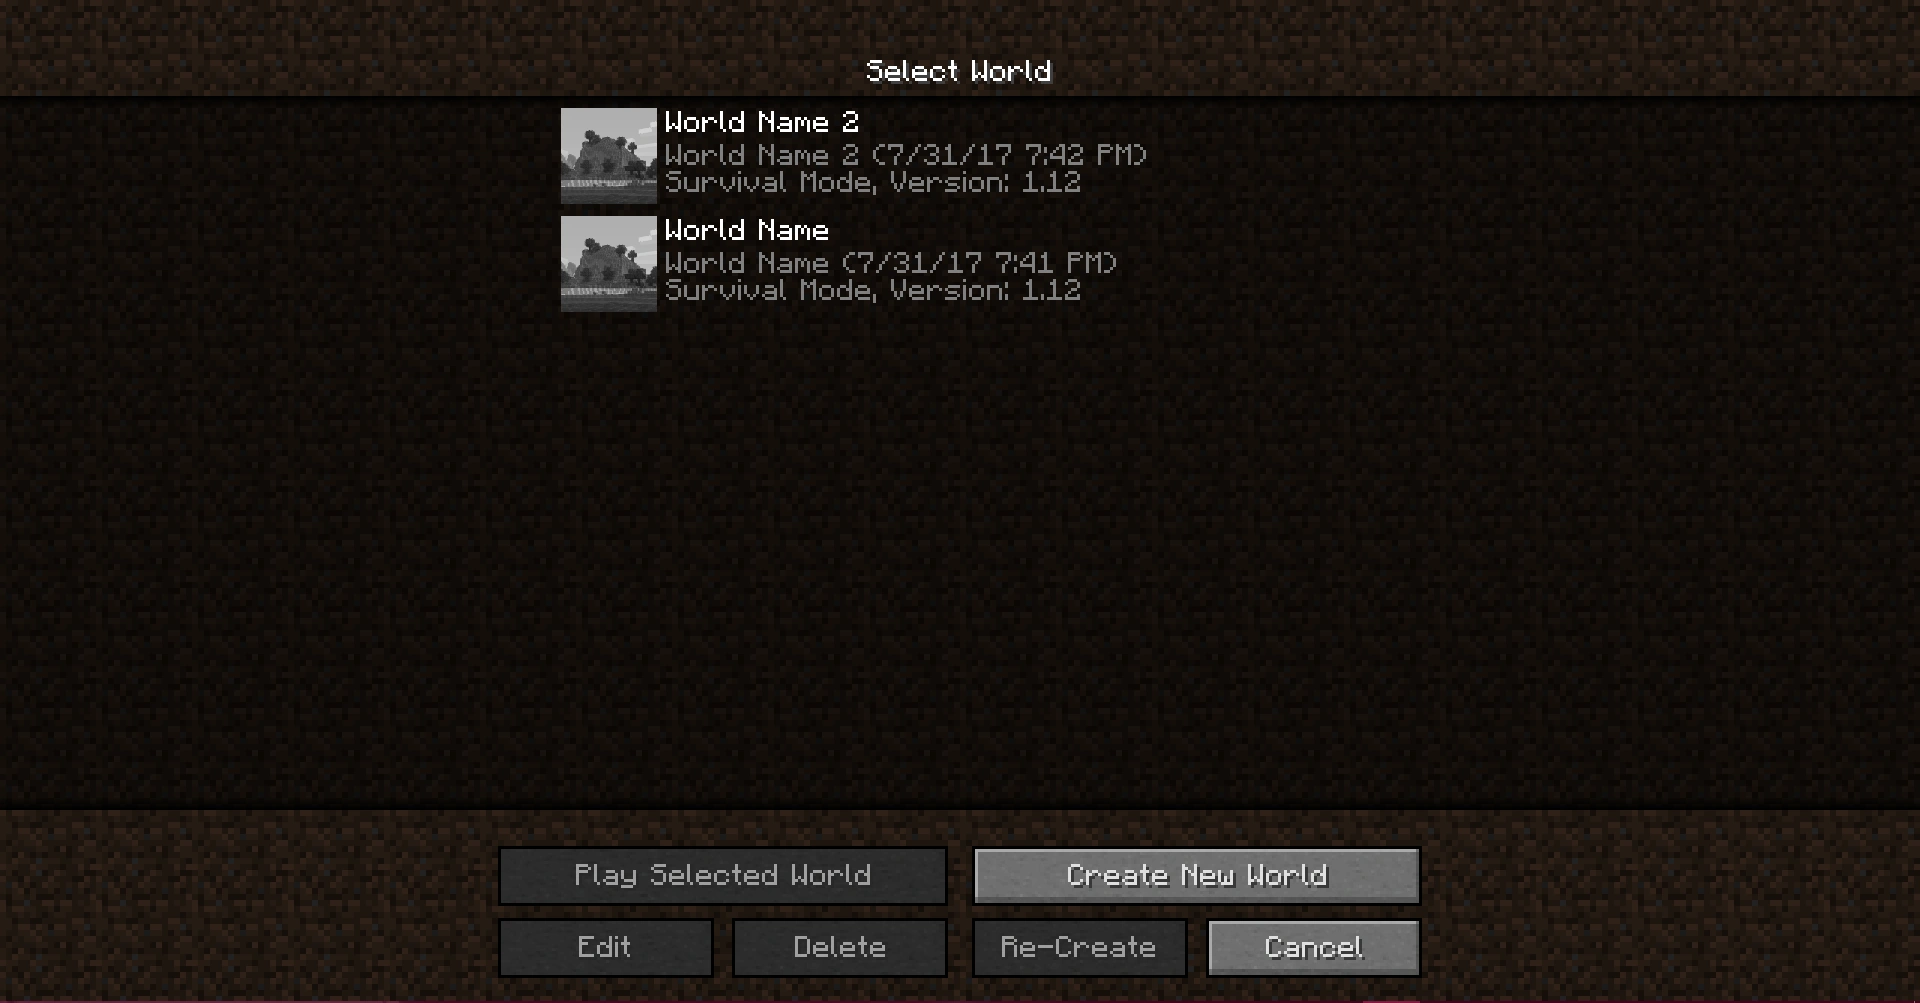
싱글플레이 메뉴
메인 메뉴에서 버튼 그룹의 가장 맨 위에 있는 싱글플레이 버튼은 오른쪽에 있는 그림과 같은 화면으로 연결된다. 이 메뉴에서 당신의 모든 싱글플레이 세계를 보고, 편집하고, 플레이할 수 있다.
오른쪽에 있는 스크린샷에는 서로 다른 두 개의 세계가 있다. 각각의 세계는 목록에서 다음 정보가 포함된 각 세계의 섹션이 있다.
| 키 | 설명 |
|---|---|
| 세계 이름 | 현재 세계의 이름이다. 편집 단추를 클릭해서 변경할 수 있다. |
| 세계 파일 이름 | 세계가 저장되어 있는 파일의 이름이다.
또한, 세계에 엑세스한 최근 시각과 날짜를 표시한다. |
| 게임모드 정보 | 그 세계의 게임모드를 표시하고 마지막으로 엑세스한 마인크래프트의 버전을 표시한다.
또한 치트가 켜져있는지 여부를 표시한다. |
또한, 세계 목록 아래에 있는 버튼 그룹들은 아래에 설명되어 있다.
| 단추 | 기능 |
|---|---|
| 선택한 세계 플레이 | 선택한 세계에서 플레이할 수 있다. |
| 새로운 세계 만들기 | 새로운 세계의 설정을 변경하고 만들 수 있는 또 다른 화면으로 이동한다. |
| 편집 | 선택한 세계를 편집할 수 있다. |
| 삭제 | 선택한 세계를 삭제할 수 있다. |
| 다시 만들기 | 동일한 세계 옵션으로 다른 세계를 만들어 선택된 세계를 복사한다.
이 복사본은 플레이어가 세계를 수정하기 전까지는 초기의 세계 상태 그대로 복사된다. |
| 취소 | 메인 메뉴로 되돌아간다. |
새로운 세계 만들기

새로운 세계를 만들 때 보여지는 화면
앞에서 언급했듯이, 새로운 세계 만들기를 누르면 만들 세계의 설정을 변경할 수 있는 다른 화면으로 이동된다.
| 단추 | 기능 |
|---|---|
| 세계 이름 | 만들 세계의 이름을 변경할 수 있다. |
| 게임 모드 | 세계의 기본 게임 모드를 변경할 수 있다. |
| 고급 세계 설정... | 다음 작업을 할 수 있는 세계 설정 메뉴로 이동한다. |
| 새로운 세계 만들기 | 선택한 설정으로 새로운 세계를 만든다. |
| 취소 | 싱글플레이 메뉴로 돌아간다. |
고급 세계 설정


"고급 세계 설정" 화면이다.
| 키 | 기능 |
|---|---|
| 시드 | 세계를 생성할 시드 |
| 세계 유형 | 만들 세계 유형:기본, 완전한 평지, 넓은 생물군계, 증폭, 사용자 지정, 또는 디버그 모드가 있다. 디버그 모드는 ⇧ Shift를 누르면서 세계 유형을 전환하다 보면 나타나서 사용할 수 있다. |
| 구조물 생성 | 세계 곳곳에 마을, 요새 및 기타 구조물을 생성할 수 있는 기능 |
| 치트 허용 | 세계 안에서 명령어를 사용할 수 있는 기능 |
| 보너스 상자 | 기본 필수품(나무 곡괭이, 사과, 나무 판자 등과 같은)이 들어 있는 상자가 스폰포인트 주변에 생성될지 여부 결정 |
완전한 평지 사전 설정(프리셋)
생성될 세계를 위한 사전 설정을 설정한다.
| 사전 설정 | 설명 |
|---|---|
| 기본 평지 | 완전한 평지 세계의 기본 |
| 광부의 꿈 | 나무, 식물, 그리고 200개 이상의 돌층이 있는 세계 |
| 물의 세계 | 물로 채워진 세계 |
| 오버월드 | 오버월드를 본뜬 세계 |
| [[눈| 눈 덮인 왕국 | 눈으로 채워진 세계 |
| 무저갱(밑 없는 구멍) | 기반암층이 없는 세계 |
| 사막 | 사막 세계 |
| 레드스톤 준비 | 레드스톤 장치에 적합한 사암 세계 |
| 공허 | 공허밖에 없는 세계 |
Page 1 기본 설정
| Key | Description/Action | Default Value |
|---|---|---|
| Sea Level | the surface level of all oceans and rivers. | 63; values range from 1-255 |
| Caves | Caves are only generated underground | 예 |
| Strongholds | Strongholds are generated in a certain fashion | 예 |
| Villages | Villages will only generate under certain biomes such as plains, savanna, taiga, or desert biomes | 예 |
| Mineshafts | Whether abandoned mineshafts are generated | 예 |
| Temples | Whether jungle temples, desert temples, swamp huts, and igloos generate | 예 |
| Ocean monuments | Whether ocean monuments will generate | 예 |
| Woodland Mansions | Whether woodland mansions will generate | 예 |
| Ravines | Whether ravines will generate | 예 |
| Dungeons | Whether dungeons will generate | 예 |
| Dungeon Count | How many times the game will try to generate a dungeon per chunk | 7; values range from 1-100 |
| Water Lakes | Whether water lakes will generate | 예 |
| Water Lake Rarity | Percentage of rarity of a water lake | 4; values range from 1-100. |
| Lava Lakes | Whether lava lakes will generate | 예 |
| Lava Lake Rarity | Percentage of rarity of a lava lake | 80; values range from 1-100. |
| Lava Oceans | Whether oceans and rivers will be filled with lava instead of water | 아니요 |
| Biome | Which biome(s) should generate | All |
| Biome Size | Increase or decrease the size of the biomes | 4; values range from 1-8 |
| River Size | Increase or decrease the size and frequency of rivers | 4; values range from 1-5 |
Page 2 Ore Settings
| Key | Action |
|---|---|
| Spawn Size | The chunk size of dirt to spawn |
| Spawn Tries | How many tries before spawning dirt |
| Min. and Max. Height | From lowest spawn height (Y) to highest
|
Page 3 Advanced Settings (WIP?)
Can be modified for terrain smoothness, terrain height etc.
Page 4 Extra Advanced Settings (WIP?)
Can be modified to change more terrain generation stuff
Customize World Presets
| Preset | Description |
|---|---|
| A world filled with water | |
| A world with many sky islands | |
| A ravine world with loads of ore | |
| A world with enormous mountains | |
| A world with deserts and stone. Water is very rare | |
| A world filled with caves all around | |
| A world with lava oceans |
Multiplayer
Multiplayer Screen with 2 servers
The Multiplayer button, found below the Singleplayer button, 화면으로 이동한다. Multiplayer Menu which lets you join servers with other players, whether online or nearby. It appears with a list of known servers which you may connect to. When you first log in, the message "Scanning for Games on Your Local Network" will appear, meaning it is scanning for nearby servers which have been opened to LAN via the Pause Menu. You will also find several buttons on the bottom of the interface.
| Key | Action |
|---|---|
| Join Server | Allows you to join the selected server |
| Direct Connect | Allows you to connect to a server by entering its address |
| Add Server | Allows you to add a server to your list by entering its name and address
|
| Edit | Edit the name and address of a server |
| Delete | Removes the selected server from the list |
| Refresh | Reload the page to fix any issues |
| Cancel | Return to the home screen |
Add Server
In order to add servers to your server list, you will need to use the "Add Server" button, which takes you to a new menu where you can add a server by entering its name and address.
| Key | Action |
|---|---|
| Server Name | Allows you to type in a name for the server to be listed as |
| Server Address | Allows you to type in the IP address for the server |
| Server Resource Packs | Allows you to change how server resource packs will be shown
|
| Done | Saves the changes and adds the server to the list |
| Cancel | Return to the server list without adding the server. |
마인크래프트 Realms
메인 메뉴의 세번째 단추는 Minecraft Realms라고 써져 있다. 써져 있는 대로, 이 단추는 Realms에 엑세스하고 Realms의 모든 기능을 사용할 수 있게 해 준다.
Realms 화면
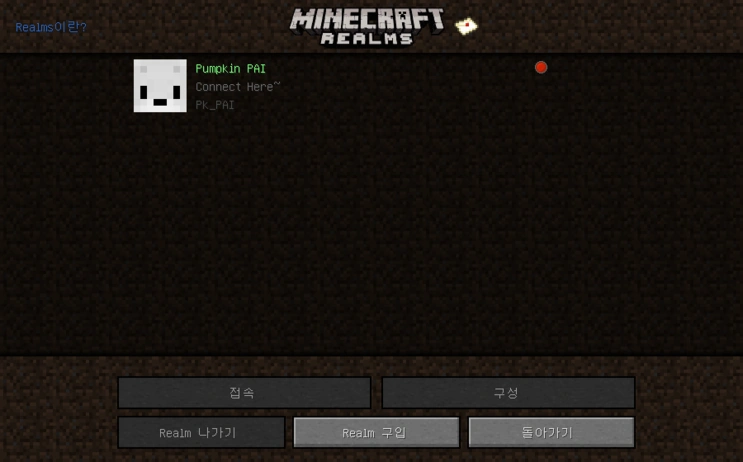
Realms의 "기본 화면"
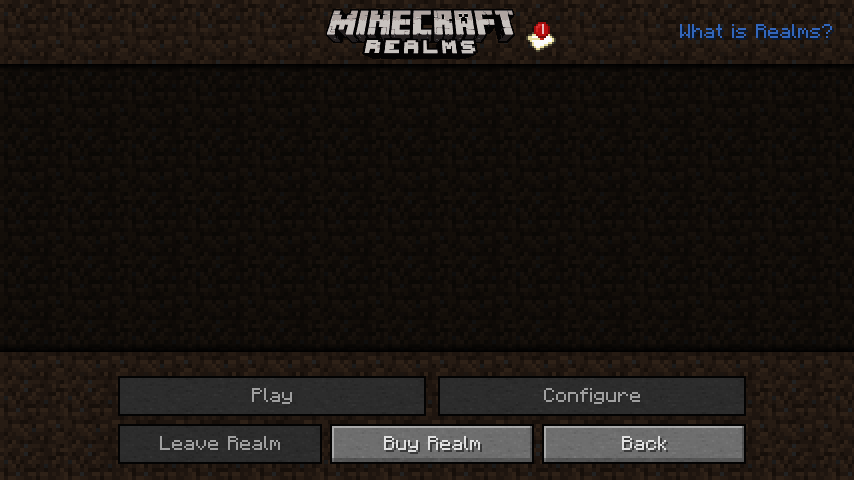
The 마인크래프트 Realms button will take you to the "Homepage" of Realms. Here you can perform all of the basic actions associated with Realms, which are as follows:
- See all of the Realms you own / are invited to and information about them
- Play on a Realm
- Buy a new Realm
- Configure your own Realm(s)
- Leave a Realm
- See new invitations
- Find out more about Realms
The majority of these functions can be carried out by clicking on a Realm and using the button group at the bottom of the screen. Invitations can be accessed via the envelope next to the Realms logo. The What is Realms? link in the upper right hand corner 화면으로 이동한다. Realms website where you can learn more about the program.
There is a distinct difference between the server list in the Multiplayer screen and the Realms list. Here you can see all of the basic information about the Realm you may need. The exact layout is shown here:
| Key | Action |
|---|---|
| Realm name | Can be changed by the owner
Displays green if you're the owner of that Realm. |
| Realm description | Can be changed by the owner
When a Minigame is active, this line is replaced with a Minigame notice. 파일:Realms MinigameNotice.png |
| Realm owner's name | Shows the current chosen username of the owner (not their UUID) |
| Realm owner's face | Can be changed by the owner changing the face of their skin |
| Realm status | Has three states: Green, Gray, and Red
|
| Online player count | Updates constantly to show the number of players currently playing on the Realm |
More About the Status Icon
The Realm status icon does more than just display the current status of the Realm. 10 days prior to your Realm's expiration date, it will start blinking (for the owner only). When hovered over it will say Expires in # days, with the # being the number of days until it expires. On the day of expiration it will display Expires soon, until it actually expires and turns red.
Invitations
Invitations can be accepted or declined via the envelope next to the Realms logo. If you have an invitation you will see a little number dancing on the envelope. If the little number is instead !!! then that means that you have more than five invitations.
If you hover over the envelope, a tooltip will appear. It will either say No pending invitations! or Pending invitations! If you click on this when you have some invitations, it will take you to a screen where you can accept or decline various invites.
The screenshot at right is a list of any and all Realms you have been invited to. The operations here are simple: You simply click on a Realm and you can either accept the invitation or decline it.
Once you have been invited to a Realm and accepted it the Realm will appear on your Realm list. At any time you can click on that Realm and click the "Leave Realm" button, which will uninvite you from that Realm until such time as you are invited again.
If you decline an invite your name is taken back off the invited list of that Realm, but keep in mind that he/she can re-invite you at any time. If you are getting spammed with an invite from a particular person and you don't want to see them again, email the support address and they may be able to help.
Realm Configuration
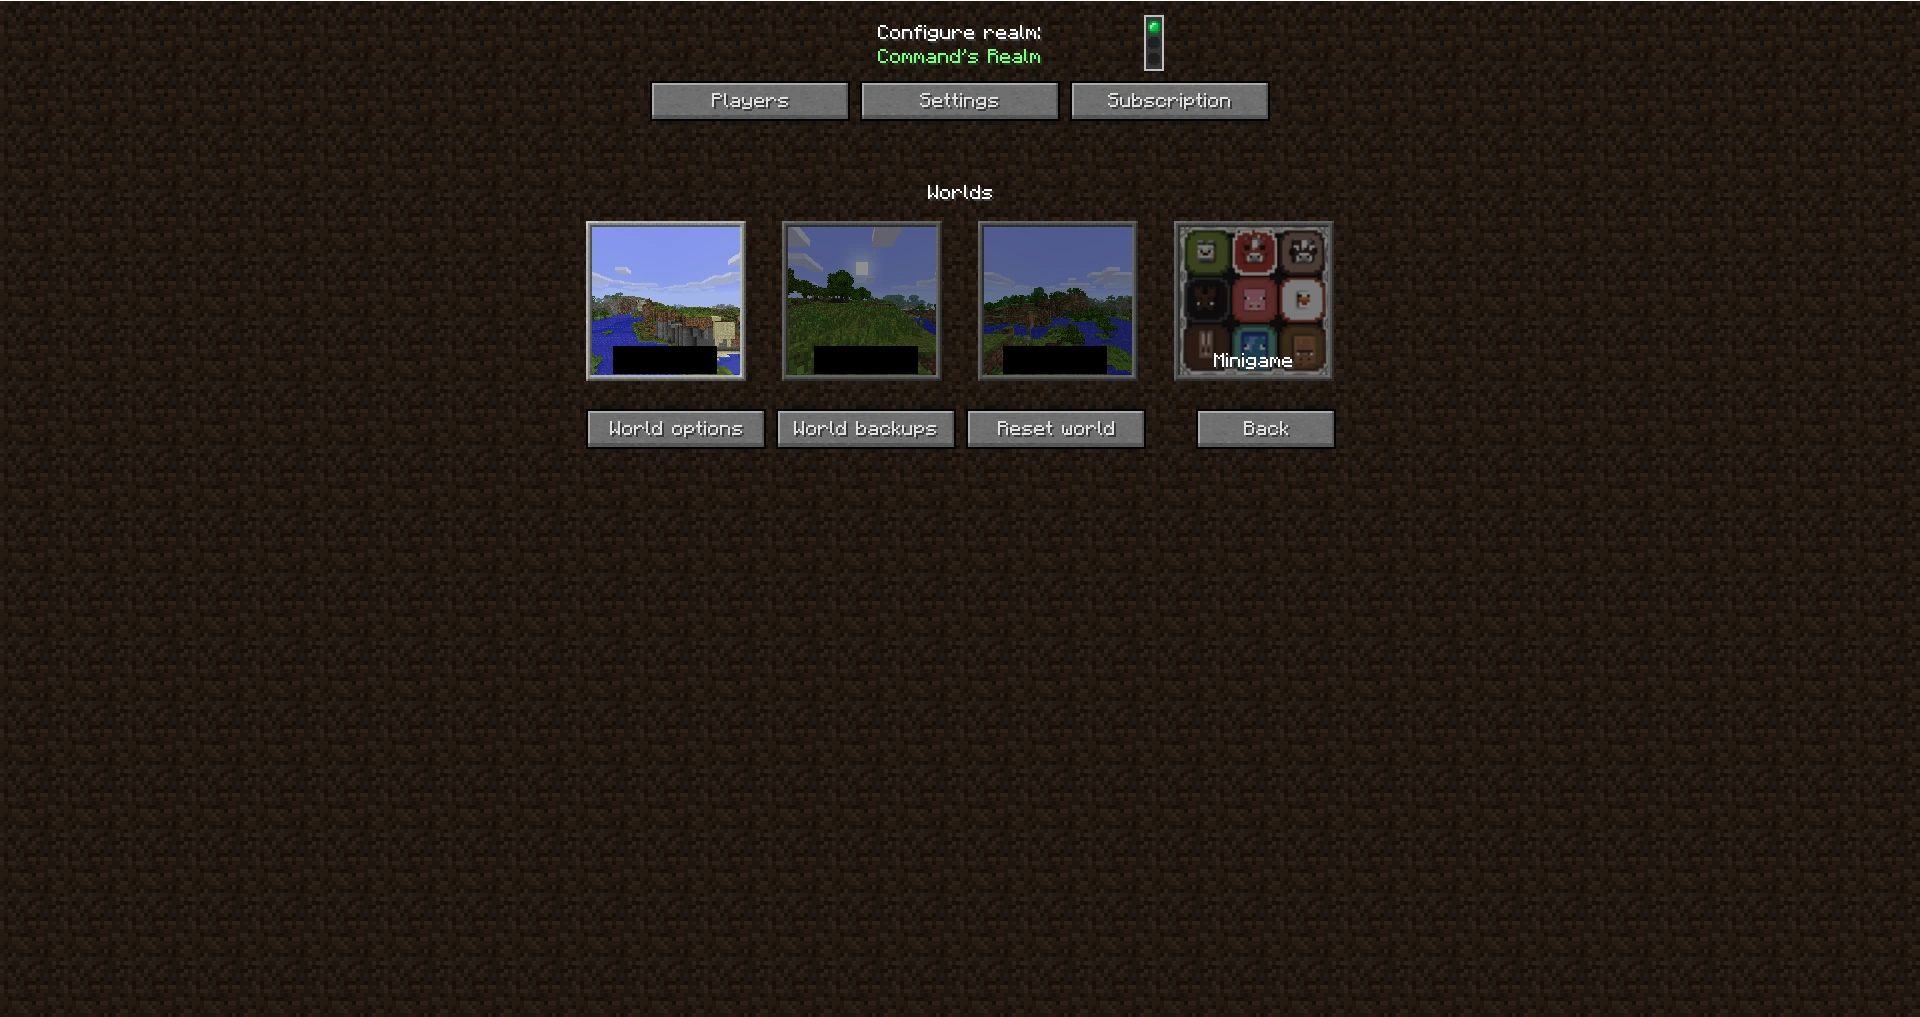
The owner of a Realm has the ability to configure his/her Realm from inside Minecraft. To access the configuration screen you simply click on your Realm and click the Configure button.
From this screen, you can completely manage your Realm and its players. Written below is a detailed walkthrough of everything you can do to manage your Realm.
Player Management
To invite a player to your Realm all you need to do is click the + button and type in that player's username. When you click Invite, that player will be added to the whitelist and they will receive an invitation letter (explained above.) In this list you can see the player's name and face, and you can also promote, demote, or remove them.
Promoting a player is done by clicking the crown icon next to their name. If it's lit up that player is promoted. If it is gray, that player has not been promoted. Being promoted is equivalent to becoming OP on the Realm. Only the owner can promote or demote players.
To remove a player all you need to do is click the red x button next to their name. They will be taken off the whitelist and your Realm will disappear off of their list.
Tracking Players
Realms also gives you the ability to monitor player activity. To do this, click the Player Activity button below the + button. In this screen, you can see who has been on at specific times of the day and days past. Every player is assigned a color code and the time they spend on your Realm is depicted with varying lengths of bars in their color.
World Management
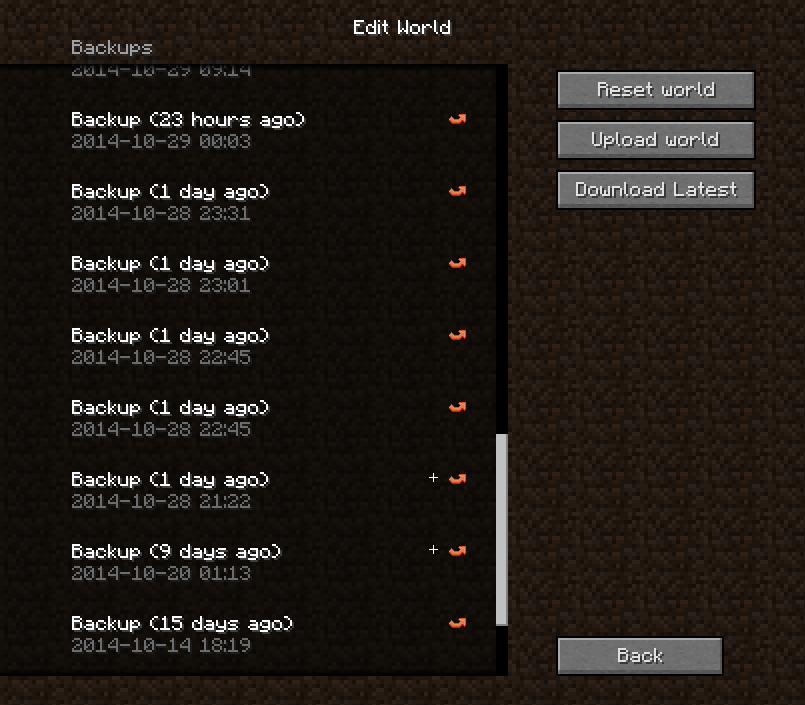
The Edit World button on the Configuration screen takes you to a view similar to the one on the right. Here, you can edit your world file, which include the following functions: Reverting to a backup, downloading the latest backup, uploading a world from your current Singleplayer worlds, and resetting your world.
To manage backups, look to the left section of this screen. The list you see contains different backups of your world that Realms has saved over time. In each module, you can see the date and time for each backup. To the right of each backup is an orange arrow button. Click this and Realms will prompt you to clarify that you want to revert to that backup. If you click ok, Realms will take a moment and replace your current world with the backup you selected. Everything will be as it was when that backup was made. When a change in world, name or description is made there will be a plus sign next to the backup, that when clicked on will tell what was changed in that backup.
On the right, you have three buttons: Upload World, Download Latest, and Reset World.
Upload World
Realms allows you to upload a local game if it is 500MB or smaller so that you can continue playing online with friends. Once your local game has been uploaded, there are no size limitations within Realms. Note that there is a limit to the number of times you can upload or download a saved game. Currently it appears to be 3 uploads/downloads per 72-hour period, but there is no UI to indicate the number you have used, nor the amount remaining. After reaching the limit, you will be unable to further update or download your latest backup, however uploads and downloads are tracked separately. Support cannot reset this counter, and it takes 24–72 hours to reset.
Minigames
In the Configuration screen, there is a button at the top that says Switch to Mini Game. Switching to a mini game will not delete your realm.
Realm Management
Allows managing the realm.
Realm Information
Allows you to change realm information.
Subscriptions
Shows the start of the subscription, in how many days it will be renewed, and a link to extend it.
Other Features
Expired Realms
After your subscription for a Realm expires, it is transferred to expired status. Many things in the interface change, as seen in the gallery below. Your server status indicator turns red, and when hovered over displays the message Expired Server. It will remain like this, as far as anyone knows, indefinitely. You can extend the Realm when it is in this state to keep the same server.
- Realms ExpiredMainScreen.png
The main screen with an expired Realm. You cannot choose to play the Realm when it is expired.
- Realms ExpiredConfigScreen.png
The configuration screen for an expired Realm.
- Realms ExpiredWorldScreen.png
The Edit World menu on an expired Realm.
- Realms ExpiredSubScreen.png
The Subscription screen on an expired Realm.
Options
Pause Menu
| Key | Description/Action |
|---|---|
| Back to game | Allows you to continue the game |
| Advancements | Brings you to a list of advancements. Each advancement you earn gives you more advancements to unlock. Hovering over an icon gives you the advancement name, requirements, and status |
| Statistics |
Statistics are a game feature that allows players to track how many times they have completed certain tasks. When the Statistics button is clicked, it brings up the menu on the left. |
| Open to LAN | Will open the world you are in to your local area network. By doing so, anybody connected to your local area network can connect to your world. (Note that this option is however grayed out during online games.) This will be reset when you quit the game when you published it via Singleplayer worlds. (Multiplayer servers never reset this). the /publish command has the same result.
|
| Save and Quit to Title | Saves your world and take you back to the main menu. |
| 개요 |
| ||||||||||||
|---|---|---|---|---|---|---|---|---|---|---|---|---|---|
| 일반 |
| ||||||||||||
| 저장소 문제 해결 |
| ||||||||||||
| 농장 |
| ||||||||||||
| 마법 부여와 제련 |
| ||||||||||||
| 블록 깨기 |
| ||||||||||||
| 기계장치 |
| ||||||||||||
| 서버 |
| ||||||||||||
| 기술적 사항 |
| ||||||||||||
| 오래된 문서 |
| ||||||||||||