이 튜토리얼은 초보자들을 위한 튜토리얼 입니다!! 컴포넌트에 대한 자세한 것을 보기 위해서 오셨다면, Entity Component Reference Guide를 참고해주세요. 이 튜토리얼 에서 다루어 볼 것은:
- 어떻게 리소스 팩을 만드나요?
- 어떻게 [] 텍스쳐를 변경하나요?:
- 개체
- 블록
- 아이템
시간 경과[]
이 튜토리얼은 1~1.5시간 정도 걸립니다.
필요한 도구들[]
당신은 밑에 있는 프로그램들이 필요할 것 입니다.
텍스트 에디터[]
아무거나 해도 괜찮지만 저는 프로그래밍 IDE 같은 것을 쓰는 걸 추천 드립니다. Notepad++ 가 이런걸 담고있고, 계다가 무료고, 텍스트 에디터에서 많은 프로그래밍 언어의 강죠 표시까지 담고 있습니다. 이 프로그램은 이 사이트에서 다운로드 하실 수 있습니다: https://notepad-plus-plus.org/
이미지 에디터[]
그림판도 대부분 텍스쳐에서 잘 될껍니다만, 닭 같이 투명도가 저장되진 않습니다. GIMP (GNU Image Manipulation Program) 는 투명도 까지 저장 해주는 무료 프로그램 입니다. 이 프로그램은 이 사이트에서 다운로드 하실 수 있습니다: https://www.gimp.org
시작하기[]
이제 본격적으로 어떻게 리소스 팩을 만드는지 알려드리겠습니다. 리소스 팩은 텍스쳐, 모델, 에니매이션, 소리, 사용자 인터페이스 그리고 언어 를 번경할 수 있습니다. 이 튜토리얼 에서는 텍스쳐 변경에 집중할 것 입니다.
리소스 팩 만들기[]
resource_packs 폴더로 이동하는 것으로 시작합시다. 파일 경로는 이런 식으로 될것입니다:
%localappdata%\Packages\Microsoft.MinecraftUWP_8wekyb3d8bbwe\LocalState\games\com.mojang\resource_packs
리소스 팩 폴더로 이동 하였으면, 이 이름으로 된 폴더를 생성하세요: “Tutorial_Resource_Pack”. 그 후, 폴더를 열어주세요.
첫번째로 해야할 것은 manifest.json 파일을 만드는 것 입니다. 이 파일은 팩 이름, 설명, UUID 와 같이 우리의 리소스 팩 정보를 담는 파일입니다.
UUID에 대한 짧은 말[]
UUID는 책에 대한 고유한 ID 같은 것 입니다. 이런 이유로 인해, UUID는 무조껀 같으면 안됩니다! 다른 팩에서 가져오며 UUID를 번경하지 않으면, 당신의 팩이 게임에서 뜨지 않을 수도 있습니다! 다행이도 UUID는 쉽게 만들 수 있어요! 이 사이트에서 만들 수 있습니다: https://www.uuidgenerator.net/version4. 새로운 것을 발급 받고 싶을 땐 새로 고침 하세요.
JSON 파일 만들기[]
JSON 파일을 만들기 위해선, 'Tutorial_Resource_Pack' 폴더에서 우클릭 한 후 '새 문서 만들기'를 누르세요. 그 다음 그 파일의 이름을 “manifest.json” 으로 바꾸세요.
짧은 말[]
파일 확장자가 진짜 .json 인지 확인 하세요. 파일 확장자가 변경되면 사용할 수 없다는 경고가 나올 수 있습니다. 하지만 괜찮아요!
If you can’t see file extensions, you can turn them on by going to the View menu of the file explorer and checking the check box for file name extensions.

manifest.json[]
manifest.json 을 텍스트에디터로 열어서 다음을 복사하여 붙여넣으세요.
- manifest.json
{
  "format_version": 1,
  "header": {
    "description": "Tutorial Resource Pack",
    "name": "Tutorial Resource Pack",
    "uuid": "bc2a0bc9-e3a2-4702-9319-d4d3231dfdbc",
    "version": [0, 0, 1]
  },
  "modules": [
    {
      "description": "Tutorial Resource Pack",
      "type": "resources",
      "uuid": "891f5751-bb0e-47c6-91f0-fdc4e76949ef",
      "version": [0, 0, 1]
    }
  ]
}
Alternatively, you can copy the included file called “Resource_pack_manifest.json” into your Tutorial_Resource_Pack folder and rename it to “manifest.json”.
Make sure that the two uuid's in the modules section are two different UUIDs, as mentioned above, you can generate UUIDs online here: https://www.uuidgenerator.net/version4 . The name and first description field can be filled in with whatever text you’d like to display in game.
Note[]
This file is in the JSON data format! We won’t go into specifics about the format now, but be aware about how things are laid out. Be very careful not to forget quotation marks, colons, and curly or square brackets. Missing one of these can lead to your Resource Pack not working correctly!
Testing our Pack[]
Now we are ready to test it out in game! Launch Minecraft and create a new world. On the left side of the screen scroll down and click on Resource Packs. On the right side of the screen scroll until you see “Tutorial Resource Pack”. Your game should look something like this if you used the above code:
Troubleshooting[]
If you don’t see your pack in game, make sure your manifest.json is correct. Look for any missing curly braces { }, commas, colons :, quotation marks “”, or square brackets [ ]. Remember for each open brace, quotation, or square bracket, you must have a closing brace, quotation, or square bracket.
택스쳐팩 아이콘 만들기[]
As you may have noticed, our pack does not have an icon! If you do not specify an icon, a pink and black checkerboard texture will show up next to your pack.
In the image editor of your choice, create a new image with a size of 128 by 128 pixels.
To do this with MS Paint:
- Click resize
- Change from percentage to pixels in the resize dialog that pops up
- Uncheck maintain aspect ratio
- Type in 128 in both horizontal and vertical text entry boxes
- Click OK
Once you have the correct canvas size, draw whatever you want your icon to be. For this tutorial, we’ve created a crudely drawn smiley face:
Save your icon with the name “pack_icon” and make sure that it is saved as a .png. Save it into the same folder that we put our manifest.json file. For reference, our folder should look like this now:
Now if we launch the game and go to the resource packs section of create world it should look something like this:
Click on the tutorial resource pack to add it to the world you are making!
Modifying an Entity’s texture[]
Now that we have our resource pack set up, let’s modify the creeper’s texture!
However, before we can do some painting, we need to set up the folder structure that Minecraft expects resource packs to be in. To do this, do the following:
- Create a folder named “textures” in our Tutorial_resource_pack folder
- Inside “textures”, create a folder called “entity”
- Inside “entity”, create a folder called “creeper”
- Copy the creeper texture from the Vanilla Minecraft resource pack into our newly created creeper folder. The texture can be found here: \Vanilla_Resource_Pack\textures\entity\creeper
Your folder should now look like:
Now that we have the normal creeper texture, open it up in the image editor of your choice. It should look something like this:
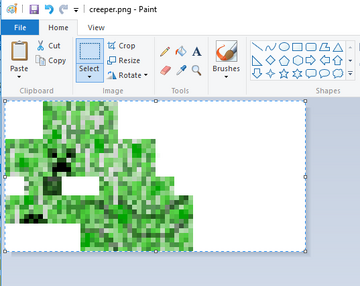
You might notice your texture looking small, make sure to zoom in on the texture. In MS Paint you can control magnification in the bottom right hand corner of the window with the slider.
A quick note on textures[]
If you’ve never seen a texture before, the above image might surprise you. The best way to think about it is like wrapping a gift with wrapping paper, but instead our wrapping paper is our texture. Here is how the creeper’s texture is laid out:

| Image Key | |
|---|---|
| Top | Top of cube |
| Bot | Bottom of cube |
| Left | Left side |
| Frnt | Front side |
| Rt | Right side |
| Bck | Back side |
Areas with matching colors face the same direction (i.e. Red areas are always the front of a cube).
How this looks in game:
Note[]
Not every texture is laid out in the same way, you will need to experiment and find out how each entity’s texture is laid out. Advanced users can look at the mobs.json file in the model folder to find where the textures' UVs are for each body part.
Now it’s time to be creative! Edit the creeper however you want. I’m just going to add a headband for sake of simplicity.
Once you are happy with your texture, save out the file as a .png and make sure that the file name is “creeper”. The game will only look for files with the correct name. When in doubt, check the Vanilla Minecraft Resource Pack to see file names.
A note on texture file formats[]
Minecraft supports .pngs, .tgas and .jpgs. However, it will first try to load the png version, then the tga, then the jpg. This means if you have 2 creeper textures, one as a png, and one as a tga, the game will see the png one first and load that as your creeper’s texture.
우리의 리소스팩을 테스트 하는 방법[]
- 마인크래프트를 연다
- 새로운 월드를 만든다
- Esc키 를 누른다
- 리소스팩 버튼을 누른다
- Tutorial Resource Pack 을 찾아 클릭한다
- 플레이 를 누른다
- 크리퍼를 소환한다
Results[]
If you decide you want to make some changes to your texture, just save and quit the level, close the game, edit your texture, relaunch the game, and follow the steps above to create a new world and attach your resource pack to it again. Note that if you launch the last world, you will not see the changes. This is because when you create a world with an add-on attached, it copies your add-ons into the world file. This means you will have 2 different versions of your pack. As you continue to work on the one in the resource_packs folder, the one attached to your world will become out of date.
Alternatively, you can work directly on the pack attached to the world to avoid having to create a world every time. You can find the pack inside of the resource_packs folder in the world’s folder. However, if you then want to add this add-on to another world, you will need to manually copy it back into the com.mojang/resource_packs folder.
Challenge 1[]
Using what you know now, create a new texture for pigs and for chickens.
- HINTS
- Chickens don’t have a folder for their textures like creepers, their texture just goes in the textures/entity folder.
- Chickens have transparency, so remember to use an image editing program that can save transparency
Block Textures[]
Now that we’ve gone through the process for an entity, changing textures for a block should seem straightforward. Let’s create a new texture for our stone block.
To create a new stone texture:
- In your textures folder create a new folder called “blocks”.
- Copy the stone texture from the Vanilla Minecraft Resource Pack into our new blocks folder
- It can be found here: /Vanilla_Resource_Pack/textures/blocks/stone.png
- Open stone texture in an image editing software and make edits
- Test in game
Here is my new stone texture:

and how it looks in game:
Challenge 2[]
Congratulations! Now that you can create your own block textures, try making a new texture for the furnace.
HINT: furnaces use different textures for front, side, top, and front when turned on, make sure to edit all of them.
Item Textures – Challenge 3[]
Creating a new item texture is like making a new block texture. Follow the same steps as above but make sure to make a folder called “items” in your textures folder and place your item textures there. Remember, you can always look at the Vanilla Minecraft resource pack as an example (/Vanilla_Resource_Pack/textures/items).
Environment Textures[]
You can also change the textures for clouds, the moon, the rain, the snow, the sun, and the cracking animation that plays when you break blocks. These textures should be put into a folder called “environment” in the textures folder.
Troubleshooting textures[]
If your texture is not showing up in game, check the following things:
- Make sure it has the same name as the asset you are trying to replace
- Example: Creeper texture should be called “creeper”, stone texture is called “stone”
- Make sure the texture is in the correct folder!
Congratulations[]
You’ve completed this tutorial and should now know how to create your own resource pack add-ons!
Exporting and Sharing[]
Now that you’ve created a resource pack, you probably want to share it with friends! To do this, perform the following:
- Navigate into your resource pack folder
%localappdata%\Packages\Microsoft.MinecraftUWP_8wekyb3d8bbwe\LocalState\games\com.mojang\resource_packs\tutorial_resource_pack
- Select all of the files and folders
- Right click on the highlighted files and select Send to -> Compressed (zipped) folder
- Name the file
tutorial_resource_pack.mcpack- Make sure to change the file extension to
.mcpack- When the popup asks you if you are sure you want to change the file extension. Hit Yes
- Make sure to change the file extension to
You can now give your friends that file! When they open it, Minecraft will launch if it isn’t running yet, and then it will import your resource pack for them to use!
Note[]
You can test to see if this work by deleting your copy in your resource_pack folder (make a backup first!), then opening your mcpack to import it. If it doesn’t work, make sure you selected the contents of your resource_pack and not the folder itself when making the .mcpack to .zip.
| Editions |
| ||||||||||
|---|---|---|---|---|---|---|---|---|---|---|---|
| Development |
| ||||||||||
| Technical |
| ||||||||||
| Multiplayer |
| ||||||||||
| Exclusive features |
| ||||||||||
| Removed |
| ||||||||||
| 개요 |
| ||||||||||||
|---|---|---|---|---|---|---|---|---|---|---|---|---|---|
| 일반 |
| ||||||||||||
| 저장소 문제 해결 |
| ||||||||||||
| 농장 |
| ||||||||||||
| 마법 부여와 제련 |
| ||||||||||||
| 블록 깨기 |
| ||||||||||||
| 기계장치 |
| ||||||||||||
| 서버 |
| ||||||||||||
| 기술적 사항 |
| ||||||||||||
| 오래된 문서 |
| ||||||||||||